|
|
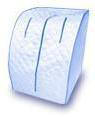
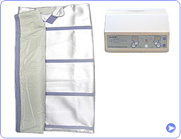
PH-2B III INFRARED SAUNA WRAP
LOW-VOLTAGE FULL-ENCLOSURE
INFRARED ENERGY WRAP
3 Heating Zone: Targeted Calorie Burn &
Slimming
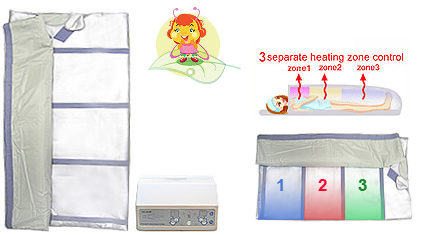
The Infrared Sauna Wrap PH-2BIII is a
low-voltage FIR device, with 3 separately controlled heating zones,
suitable for professional use at a spa, weight loss center or beauty
salon. Sturdy and made for frequent operation. Provides a complete
sauna experience. The Infrared Sauna Wrap is also portable and easy
to clean, for travel or home use. The Direct heat from the blanket
allows for gentle radiant relaxation of the muscles and controlled
perspiration.
|
INFRARED SAUNA WRAP PH-2BIII COMPOSITION AND
FUNCTIONS: |
|
 |
| |
| PANEL DISPLAY AND FUNCTIONS OF THE KEYS: |
 |
| The Infrared Sauna Wrap PH-2BIII is
composed of a control box, a thermal blanket, a main power lead and
3 connection leads. The control box keeps a memory of the last
settings used |
|
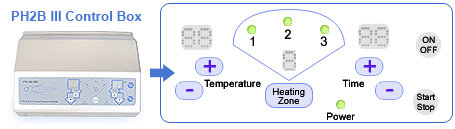
Control Box:
|
adjusts and controls the temperature
and timer settings of the blanket. |
|
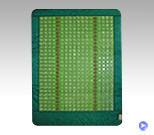
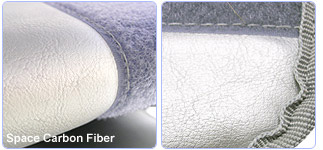
Thermal Blanket:
|
conducts heating to the body. Made of Nylon,with
Space Carbon Fiber heating elements, covered by a layer of PU
(polyurethane) fabric |
|
Power Cord:
|
supplies main power to the control box.
|
|
Connection Leads
(3): |
connect the thermal blanket to the control box.
|
|
| |
| ON/OFF |
Switch the system 'ON' or 'OFF'
|
| Channel Key
|
| Select the respective body zones
(1-2-3). One or more zones can be targeted in a sauna
session. |
|
Temperature Key (  ) ) |
| Press
to increase or press to decrease the temperature, 1 °C for
each time pressed. |
|
| Timer Key (
)
|
| Press
to increase or press to decrease the time, 5 minutes for each time
pressed. |
|
| Overload Display
|
| Overload indicator lights when the
power surpasses 300W, and the alarm buzzer will
sound. |
|
| Start/Stop Key |
| Press
Start/Stop key
to start or stop the device after setting the
temperature and
timer. |
|
|
| |
| INFRARED SAUNA WRAP PH-2BIII
INSTRUCTIONS: |
| 1. |
Place the Infrared Sauna Wrap on a flat
surface, such as the bed or floor. |
| 2. |
Wrap your body in the blanket. If a massage or body oil is
used, then it is recommended to first wrap the body in a
plastic film or sheet to protect the thermal blanket. |
| 3. |
Put the control box on a flat surface such as a table and
insert the plug into the main power socket. |
| 4. |
Connect the 3 connection leads between the thermal blanket
and the control box. Make sure that lead ‘1’ is connected to
jack ‘1’, lead ‘2’ to jack ‘2’, etc. or the thermal blanket
will not work. |
| 5. |
Turn the main power switch on at the back of the control
box. The red ‘Power’ indicator on the control panel will
light. The device has not started working yet. |
| 6. |
Press the ‘ON/OFF’ key to start setting
the temperature and the timer. The Channel
key shows ‘1’ (body zone 1). |
| 7. |
Press ‘Timer
’ to set the working time. For each time
pressed, the time will increase or decrease by 5 minutes.
|
| 8. |
Press ‘Temperature ’ to set the working temperature. For each
time pressed, the temperature will increase or decrease by 1°
Centigrade. Set the temperature to your specific
requirements. |
| 9. |
Then press ‘Heating Zone’ key to change
the zones. Repeat steps 6, 7, and 8 to set and start body
zones 2 and 3. |
| |
Zone 1: Upper body and limbs (suggested
temperature 38° C)
Zone 2: Mid body
(suggested temperature 44° C)
Zone 3:
Lower body and limbs (suggested temperature 42° C) |
| 10. |
Press ‘Start/Stop’ key. The green
indicator will light, showing that heating has started. |
| 11. |
When the heating timer counts down to ‘0’, a signal will
sound three times and the digital timer will display ‘0’
showing the heating has finished. |
| 12. |
After using, pull the plug out from the power source.
|
| 13. |
If at any time you need to stop the session, just press
the ‘Start/Stop’ key. When the green
indicator goes off, the system has stopped working. |
| 14. |
Wipe the sweat from the surface of the thermal blanket
with a wet towel and dry it by laying it flat on a bed or
table for more than 1 hour. |
| 15. |
Fold the blanket and store it in a dry and cool place.
|
| 16. |
For professional use at spa, weight loss center or beauty
salon, wipe surface of the thermal blanket as above, and leave
an interval between customer sessions of at least 1/2 hour,
preferably 1 hour. |
|
Suggested Use:
|
| 1. |
When the room temperature is lower than 20°C you may
preheat the blanket for 10 minutes prior to use. |
| 2. |
It is suggested that you be well hydrated by drinking a
glass of water prior to using. |
|
 |
|
INFRARED SAUNA WRAP
PH-2BIII TECHNICAL SPECIFICATIONS: |
| Input Volts |
100V ~120V 60Hz / 220V ~240V 50Hz
|
| Output Volts |
DC36V
|
| Input Power |
300W
|
| Materials |
Made of Nylon, covered by a layer of PU
(polyurethane) fabric, with heating elements of Space Carbon
Fiber |
| Control Panel |
Manual Control
|
| Heating Zones |
3 |
| Temperature |
30°C ~ 60 °C |
| Separate Heating Zone Controls |
YES
|
| Timer |
0~95 minutes |
| Folded Size
|
187 x 70 cm
|
| Unfolded Size
|
180 x 195 cm
|
| Net Weight |
8.3kg
|
| Warranty |
1 year
|
|
|
INFRARED SAUNA WRAP PH-2BIII |
 |
| |
|
• |
3 Heating zones
- Targeted Slimming.
|
|
• |
Low Voltage
DC36V |
|
• |
Width x Length:
180 x 195 (cm) |
|
• |
Temperature: 30°C~60°C |
|
• |
Manual Control
|
| |
Price $535.00
|
|
|
|
|
Free Shipping |
These Infrared Heat Devices are not medical products.
Not intended to diagnose, treat, cure or prevent any disease. If you are uncertain whether you can use any of these products, please consult your physician before using it. The
information and statements made are for
education purposes and are not intended to
replace the advice of your family doctor.
|
|